How to Relieve Low Back Pain with 6 Simple Moves
It's been estimated that around 80% of people will suffer some form of low-back pain in their lifetime...that's an insane statistic!
What's even more insane is there are roughly 1.2 million spinal surgeries performed each year and a whopping $90 billion spent on low-back pain issues alone. I have trained several clients who have had issues with low-back pain at one point or another and have had some issues with it myself over the years.
*There are many different reasons why people develop low-back pain. Some of the more common causes are:
• Obesity
• Prolonged poor static posture positions
• Poor physical fitness
• Heavy lifting, pushing, and pulling while twisting the spine
• Stress
• Inherited and/or developed diseases (disc disease, osteoarthritis, rheumatoid arthritis)
• Smoking
• Pregnancy
While a couple of those common causes are not within our control, the majority of them are.
Prior to getting into the fitness and health space, I ran into some issues with low-back pain more than a few times myself. After spending a good portion of my retail sales career lifting different objects that were either very heavy or bulky (or both), my back started to let me know I wasn't doing things the right way. Couple that with getting older as well as moving into roles that were more sedentary in nature - and it was a recipe for low-back pain disaster.
While your path is likely very different than mine - the odds are still not in your favor. You might be going along with no issues at all and then one day you go to bend down and pick up a pencil and - POP! Your back locks up and shooting pain goes racing down to your lower back in a crippling fashion. If you don't take steps to prevent it, you have an 8 out of 10 chance of having it get you one day...
What can I do to prevent low-back pain from coming back?
No matter what causes you (or someone you may know) low-back pain, there are several things that can be done to help alleviate it as well as steps you can take toward preventing it in the future.
Contrary to what many people may have heard about low-back pain, it is an area of the body that can actually be exercised on a daily basis. This doesn't mean to go do heavy deadlifts or power-cleans everyday (or at all if you are in the middle of battling with a low-back pain issue). You can, however, do several low-impact exercises each day that will help build and strengthen the muscles around the joints that are connected to your lower back.
Any sort of training to strengthen your lower back (specifically when you are or have suffered from low-back pain) should focus on exercises that are lower weight resistance and higher in repetitions while focused on using proper technique and form throughout. Also, never try and work through pain when exercising - stiffness, soreness, and fatigue are very different than pain.
Build your core
One of the best ways to help alleviate future low-back pain is by strengthening your core. If you are someone who has a job where you are sitting most of the time or you haven't maintained any sort of strength exercise program for a number of years - your core is more than likely weak and not helping your low-back pain situation.
Building your core is more than simply trying to get that elusive six-pack look. The major muscles that make up the core are not only fun to look at when fully developed, but they also play a critical role in moving, supporting and stabilizing your spine. There are six primary muscle groups that make up the core (I won't bore you with each of the names) - It's just important to know that there is much more to your core than meets the eye.
Many people think of sit-ups or crunches when they think of doing core exercises. While there is nothing wrong with those exercises, there are so many other exercises as well as iterations of the sit-up and crunch. There are also many people who don't fully understand how to properly perform a sit-up or crunch which can exacerbate low-back pain. Jumping right in to doing sit-ups and/or crunches just after recovering from a low-back pain episode is like trying to run a marathon shortly after recovering from an ankle sprain. It can, and likely will, cause more harm than good without giving it some time to properly heal.
Instead, ease into some basic, but highly effective core exercises in order to strengthen those muscles while reducing the risk of a low-back pain flare up.
**Below are six different exercises that are simple enough for beginners to do each and every day in order to help build and strengthen your core and low-back area. These exercises help you learn how to properly engage the muscles in your core while not putting major strain on your lower back. Each exercise shows a visual of the start to finish body position as well as specific instructions for proper guidance.
These exercises are a great way for most people to help build their core and work toward relieving - and/or preventing low-back pain.
No matter who you are or what type of lifestyle you live, take great care of your back by implementing a routine that works for you so you don't have to live with low-back pain.
Six moves to help you build your core and relieve back pain:
1. Supine Abdominal Activation (Drawing In)
Step 1
Starting Position: Lie on your back on an exercise mat or firm surface, bending your knees until your feet are positioned flat on the floor 12 - 18" from your buttocks. Extend your arms out to your sides, palms facing either up or down (illustrated) at, or near shoulder level. Breathe deeply for a 30 seconds relaxing your body and allowing gravity to gently pull your lower back and shoulders towards the floor.
Step 2
Depress and retract your scapulae (pull your shoulder down and back) without increasing the arch in your low back or lifting your hips off the mat. Hold this position throughout the exercise.
Step 3
Hollowing Movement: Breathe normally and at the end of your breaths (end-tidal volume), perform the following actions individually at first, then combine them together:
Perform a gentle "kegel" contraction without moving your hips or ribcage (the kegel contraction of the pelvic floor is the same contraction your would perform when resisting the urge to urinate)
Draw your belly button towards your spine without moving your hips or rib cage (visualize narrowing your waist circumference without taking a deep breath). Any movement of the hips or rib cage indicates activation of your larger abdominal muscles
Combine both 1 and 2 above
Combine 1 and 2, but count out loud while breathing normally (i.e. holding the contractions through normal breathing)
Step 4
Exercise Progressions: Once your have spent time learning how to co-contract the muscles of the pelvic floor and core, independent of breathing, progress the exercise complexity by adding small movements in the lower extremity:
Lift one leg 3 - 6" (no more) off the mat and hold this position briefly (illustrated) without moving your torso (hips, shoulders or increasing your low-back arch).
Heel slide, lifting the toes in one foot off the floor and slowly sliding the heel of one foot 3-6" away from your body. without moving your torso (hips, shoulders or increasing your low-back arch)
This series of exercise movements activate your core muscles that are often neglected. Good core activity helps stiffen your torso and stabilize your spine against injury as well as aids in reducing low-back pain. Try performing this exercise adjacent to a mirror that will allow you to monitor any undesired movement in the hips, ribs, shoulder or low-back.
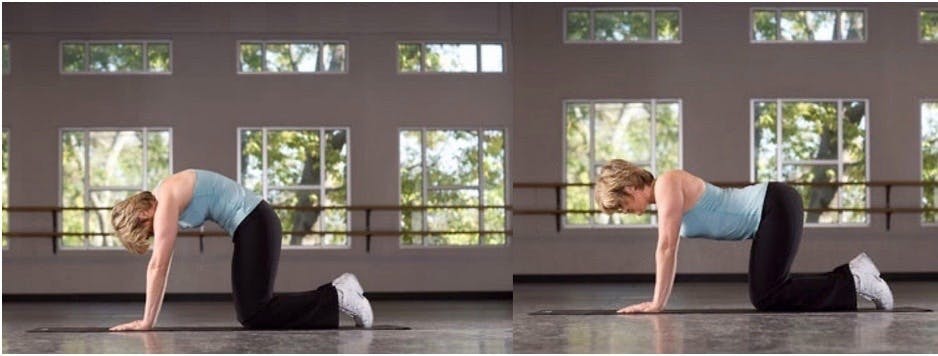
2. Cat-Cow
Step 1
Starting Position: Kneel on an exercise mat or floor, positioning your knees and feet hip-width apart, with your feet dorsi-flexed (toes pointing towards your body).
Step 2
Slowly lean forward to place your hands on the mat, positioning them directly under your shoulders at shoulder-width with your hands facing forward. Reposition your hands and knees as necessary so that your knees are directly under your hips and hands are directly under your shoulders.
Step 3
Gently stiffen your core and abdominal muscles to position your spine in a neutral position, avoiding any sagging or arching.
Step 4
Upward (Cat) Phase: Gently exhale and contract your abdominal muscles, pushing your spine upwards towards the ceiling and hold this position for 10 - 15 seconds. Allow your head to fall towards your chest, maintaining alignment with the spine.
Step 5
Downward (Cow) Phase: Slowly relax and yield to the effects of gravity. Let your stomach fall towards the floor (increasing the arch in your low back) and allow your shoulder blades to fall together (move towards the spine). Hold this position for 10 - 15 seconds before returning to your starting position
3. Dead Bug
Step 1
• Starting Position: Lie supine (on your back) on an exercise mat or firm surface, bending your knees until your feet are positioned flat on the floor 12 - 18" from your buttocks. Allow your arms to lie along your side and bend the elbows so your hands are pointing towards the ceiling. Breathe deeply for a 30 seconds relaxing your body and allowing gravity to gently pull your lower back and shoulders towards the floor. Depress and retract your scapulae (pull your shoulders down and back) without increasing the arch in your low back or lifting your hips off the mat. Hold this position throughout the exercise.
Step 2
• To start the exercise, initiate a Hollowing Movement: Breathe normally and at the end of your breaths, perform the following actions individually at first, then combine them together:
• Perform a gentle "kegel" contraction without moving your hips or ribcage.
Draw your belly button towards your spine without moving your hips or rib cage (visualize narrowing your waist circumference without taking a deep breath). •Any movement of the hips or rib cage indicates activation of your larger abdominal muscles
•Combine both 1 and 2 above.
•Combine 1 and 2, but count out loud while breathing normally (i.e. holding the contractions through normal breathing)
Once you have used a hollowing movement to stabilize your spine and pelvis, lift both legs and arms off of the floor; the knees should be directly over the hip joints and bent ninety degrees (pictured) and the elbows should be directly over the shoulder joints so your hands are pointed over your head (pictured).
Step 3
Inhale and maintain the abdominal hollowing while slowly lowering the right heel and left hand towards the floor. The hand and heel should lightly touch the floor (but not rest), exhale continue the abdominal hollowing and slowly bring the leg and arm back to the initial starting position. Alternate to use the right arm and left leg; continue to complete a specific number of repetitions or a certain period of time.
Step 4
Exercise Variation: To have more control (making it easier) when learning this exercise, start with the hands resting on the floor above the head and the feet resting gently on the floor in front of the buttocks; slowly lift the right arm and left leg off of the floor together while maintaining the abdominal hollowing, lower and alternate sides.
Continue to breathe while holding the abdominal hollowing and bracing
4. Pelvic Tilts
Step 1
Starting Position: Lie on your back with your knees bent and both feet flat on the mat/floor and the knees aligned with the second toe of each foot. Abduct your arms (extend to side) with the palms supinated (facing up to the ceiling).
Step 2
Downward Phase: Exhale and gently contract your abdominal muscles to flatten your low back into the mat/floor. Avoid trying to lift your hips (tailbone) off the mat/floor. Hold this position briefly.
Step 3
Upward Phase: Inhale and slowly relax your abdominal muscles while gently contracting your erector spinae (low back muscles) to increase the arch in your low back. Avoid raising your hips off the mat/floor. Hold this position briefly before returning to your starting position.
5. Birddog
Step 1
Starting Position: Kneel on an exercise mat or floor, positioning your knees and feet hip-width apart, with your feet dorsi-flexed (toes pointing towards your body).
Step 2
Slowly lean forward to place your hands on the mat, positioning them directly under your shoulders at shoulder-width with your fingers facing forward. Reposition your hands and knees as necessary so that your knees are directly under your hips and hands are directly under your shoulders.
Step 3
Stiffen your core and abdominal muscles to position your spine in a neutral position, avoid any excessive sagging or arching.
Step 4
Upward Phase: This exercise involves simultaneous movement of your leg and opposite arm. This exercise is best performed facing a mirror.
Hip Extension: Slowly extend your left hip (raise and straighten the knee) attempting to extend it until it is at, or near parallel, to the floor without any rotation in the hip. Your goal is to keep both hips parallel to the floor. The use of a light bar placed across the hips, parallel to the waistline of your pants, provides visual feedback to hip rotation and what corrections are needed.
Step 5
Shoulder flexion: Slowly flex your right arm (raise and straighten the arm) attempting to raise it until it is at, or near parallel, to the floor without any tilting at the shoulders. Your goal is to keep the both shoulders parallel to the floor. The use of a light bar placed across the shoulders provides visual feedback to shoulder rotation and what corrections are needed. Your head should remain aligned with the spine throughout the movement.
Step 6
The degree of hip extension and shoulder flexion is determined by the ability to control against movement in the low back. As the leg is raised, individuals may witness an increase in their low back sagging. Only raise the limbs to heights where the low back position can be maintained through the combined actions of the core and abdominal muscles.
Step 7
Downward Phase: Gently lower yourself back to your starting position and repeat with the opposite limbs.
The bird-dog is an excellent exercise to train the body how to stabilize the lumbar spine (low back) during upper and lower extremity movement. Never exceed your body's capacity to control movement in the low back
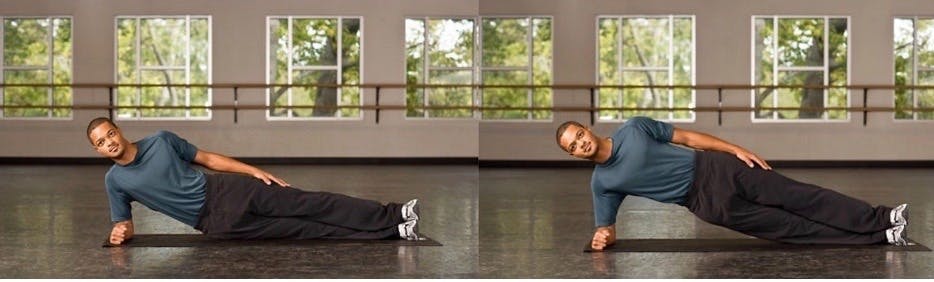
6. Side Bridge
Step 1
Starting Position: Lie on your right side on an exercise mat with extended legs, placing your left leg directly over your right leg and and stacking your feet one on top of the other. Place your right elbow directly under your shoulder, align your head with your spine and keep your hips and right knee in contact with the exercise mat.
Step 2
Upward Phase: Exhale, gently contract your abdominal / core muscles to stiffen your spine and lift your hips and knees off the mat, keeping contact with the side of your right foot and keep head aligned with your spine. Keep your right elbow positioned directly under your shoulder.
Step 3
Lowering Phase: Inhale and gently return yourself to your starting position. Alternate sides and repeat.
Step 4
Exercise Variation: You can increase the intensity of this exercise by (1) increasing the length of time you are in the raised position, (2) raising the upper leg off the lower leg or (3) raising the lower leg off the floor and maintaining contact with your elbow and the foot of the upper leg only.
When raising the upper leg off the lower leg, there is no need to raise it to a level beyond parallel with the floor.
Here's to a healthy life.
Note - this blog may contain external links to affiliate partners which can lead to us receiving commissions – if a purchase is made from that affiliate. You are under no obligation to buy anything - the purpose of our blog is to inform, educate, and (occasionally) entertain.
The contents of this post are for information and educational purposes only and are not intended to offer personal or any medical advice. It is recommended that you seek the advice of your physician or other qualified health provider with any questions you may have regarding a medical condition. It is also recommended to never disregard advice that comes directly from a medical professional, nor should you delay in seeking it because of something you have read on this website.
As always - make sure you are medically cleared by your physician prior to beginning any exercise routine.
References used on this blog include the following sources:
*Common causes of low back pain source - ACSM - American College of Sports Medicine
**The photos and steps of each exercise listed are from the ACE® (American Council on Exercise) website.